Showing posts with label Feature. Show all posts

Wednesday, November 6, 2024

Unlocking Oracle 23c AI's JSON Relational Duality: Simplifying Data Handling for Modern Applications


Unlocking Oracle 23c AI's JSON Relational Duality: Simplifying Data Handling for Modern Applications


With the release of Oracle 23c AI, Oracle has introduced a suite of new features designed to empower DBAs and developers. One of the most revolutionary additions is JSON Relational Duality, which offers unprecedented flexibility in handling data by allowing users to access the same data as both relational and JSON, seamlessly switching between formats without duplication or additional processing.

This article explores JSON Relational Duality and demonstrates how it simplifies data management for applications that need to handle both structured and unstructured data. 


What Is JSON Relational Duality?

JSON Relational Duality in Oracle 23c AI allows the same data to be represented as both relational and JSON simultaneously. This feature is particularly valuable for applications where structured relational data needs to be accessed as unstructured JSON data—and vice versa. 

For example, a company with a traditional relational structure may want to integrate with a modern application that uses JSON-based APIs. JSON Relational Duality bridges this gap, enabling applications to leverage both formats without complex transformations or performance compromises.


Why JSON Relational Duality Matters

In the past, handling both relational and JSON data often meant duplicating data or creating intricate ETL processes to convert between formats. JSON Relational Duality eliminates these challenges by allowing a single, consistent view of data that works natively with both JSON and relational formats.


- Reduced Complexity: You avoid complex ETL processes when transforming data formats.

- Enhanced Flexibility: Developers can work with the format best suited to their application needs.

- Improved Performance: Access data in the format you need without extra processing, reducing load on the system.


Getting Started with JSON Relational Duality

To demonstrate JSON Relational Duality, let’s use an example of a user, 'user', who manages employee data in a relational structure but needs to provide a JSON format for API consumption.

Suppose we have a table 'employees' with the following schema:


SQL

CREATE TABLE employees (

    employee_id NUMBER PRIMARY KEY,

    first_name VARCHAR2(50),

    last_name VARCHAR2(50),

    department VARCHAR2(50),

    salary NUMBER

);


Step 1: Enabling JSON Relational Duality


With Oracle 23c AI, we can use a 'DUPLICATE JSON' clause to enable duality, allowing 'employees' to be queried as JSON without changing the schema.


SQL

ALTER TABLE employees ENABLE JSON RELATIONAL DUALITY;


Step 2: Querying Data in JSON Format

Now, 'user' can retrieve the same data in JSON format using a simple query:

SQL

SELECT JSON_OBJECT(*) 

FROM employees 

WHERE department = 'Sales';


The query above will output each row as a JSON object, making it compatible with any API or application that requires JSON.


Step 3: Using JSON Data with Relational Functions

JSON Relational Duality allows JSON data to be used in SQL operations as if it were relational. This means that the 'user' can join, filter, and manipulate JSON data using SQL.

For example, let’s filter employees by salary and project it as JSON:

SQL

SELECT JSON_OBJECT(*) 

FROM employees 

WHERE salary > 70000;


Use Case: Integrating Relational Data with a JSON-Based Application


Imagine the 'user' is tasked with integrating an Oracle database with a cloud-based application that consumes JSON via REST API. JSON Relational Duality simplifies this process. Instead of transforming data into JSON on the fly or storing duplicates, the 'user' can directly query relational data in JSON format and feed it into the API, streamlining integration.


Example API Call with JSON Duality Data

Using JSON output from Oracle, the 'user' can now make API calls without extra data transformation:


JSON:

{

    "employee_id": 101,

    "first_name": "John",

    "last_name": "Doe",

    "department": "Sales",

    "salary": 75000

}


JSON Relational Duality in Complex Queries

Let’s explore a more complex query in which the 'user' needs to get department-wise average salaries, outputting the results in JSON format.


SQL

SELECT JSON_OBJECT(

    'department' VALUE department,

    'average_salary' VALUE AVG(salary)

) AS department_summary

FROM employees

GROUP BY department;


This query enables a modern, JSON-based interface to summarize data traditionally stored in relational format, making it accessible to front-end applications that prefer JSON.


SEO-Optimized Benefits of JSON Relational Duality


For DBAs, developers, and system architects, JSON Relational Duality in Oracle 23c AI is a keyword-rich feature that aligns with trends in hybrid database management and Oracle 23c AI JSON integration. It emphasizes dual-format data handling and native JSON support in relational databases, making it ideal for applications with mixed data needs. Key benefits like performance optimization, reduced data duplication, and simplified data management address frequently searched queries, ensuring that Oracle 23c AI remains at the forefront of modern database management.


Summary: Embracing the Duality Advantage in Oracle 23c AI

Oracle 23c AI’s JSON Relational Duality is a groundbreaking feature, particularly for DBAs like 'user', who must manage complex data structures efficiently. With JSON Relational Duality, Oracle offers flexibility without sacrificing performance, enabling seamless data integration for applications that demand both structured and unstructured data.

For anyone managing databases in hybrid environments, JSON Relational Duality is a powerful tool that reduces workload, enhances performance, and provides a competitive edge in the data-driven landscape.


Tuesday, June 28, 2016

Online table redefination

Table and Dependent Objects Creation:

Drop Existing Objects:

Before creating new objects, ensure no conflicts with existing ones:

sql

DROP PROCEDURE get_description;
DROP VIEW redef_tab_v; DROP SEQUENCE redef_tab_seq; DROP TABLE redef_tab PURGE;

Create Table:

Define the table redef_tab with a primary key:

sql

CREATE TABLE redef_tab (
id NUMBER, description VARCHAR2(50), CONSTRAINT redef_tab_pk PRIMARY KEY (id) );

Create View:

Create a view that selects all columns from redef_tab:

sql

CREATE VIEW redef_tab_v AS
SELECT * FROM redef_tab;

Create Sequence:

Define a sequence to generate unique IDs:

sql

CREATE SEQUENCE redef_tab_seq;

Create Procedure:

Create a procedure to retrieve the description based on an ID:

sql

CREATE OR REPLACE PROCEDURE get_description (
p_id IN redef_tab.id%TYPE, p_description OUT redef_tab.description%TYPE) AS BEGIN SELECT description INTO p_description FROM redef_tab WHERE id = p_id; END; /

Create Trigger:

Create a trigger to automatically assign a new ID from the sequence before inserting it into redef_tab:

sql

CREATE OR REPLACE TRIGGER redef_tab_bir
BEFORE INSERT ON redef_tab FOR EACH ROW WHEN (new.id IS NULL) BEGIN :new.id := redef_tab_seq.NEXTVAL; END; /

Verify Object Creation:

Check the status of the created objects:

sql

COLUMN object_name FORMAT A20
SELECT object_name, object_type, status FROM user_objects ORDER BY object_name;

Expected Output:


OBJECT_NAME OBJECT_TYPE STATUS
-------------------- ------------------- ------- GET_DESCRIPTION PROCEDURE VALID REDEF_TAB TABLE VALID REDEF_TAB_BIR TRIGGER VALID REDEF_TAB_PK INDEX VALID REDEF_TAB_SEQ SEQUENCE VALID REDEF_TAB_V VIEW VALID

2. Online Table Redefinition:

Check Table Redefinition Feasibility:

Verify if the table redef_tab can be redefined:

sql

EXEC DBMS_REDEFINITION.can_redef_table('ATOORPU', 'REDEF_TAB');

Create Interim Table:

Create a new table redef_tab2 with the same structure as redef_tab, but initially empty:

sql

CREATE TABLE redef_tab2 AS
SELECT * FROM redef_tab WHERE 1=2;

Start Redefinition:

Begin the online redefinition process:

sql

EXEC DBMS_REDEFINITION.start_redef_table('ATOORPU', 'REDEF_TAB', 'REDEF_TAB2');

Synchronize Interim Table (Optional):

Synchronize redef_tab2 with any interim data:

sql

EXEC DBMS_REDEFINITION.sync_interim_table('ATOORPU', 'REDEF_TAB', 'REDEF_TAB2');

Add New Primary Key Constraint:

Add the primary key constraint to redef_tab2:

sql

ALTER TABLE redef_tab2 ADD (CONSTRAINT redef_tab2_pk PRIMARY KEY (id));

Complete Redefinition:

Finish the redefinition process:

sql

EXEC DBMS_REDEFINITION.finish_redef_table('ATOORPU', 'REDEF_TAB', 'REDEF_TAB2');

Drop Original Table:

Drop the original table, which has been renamed to REDEF_TAB2:

sql

DROP TABLE redef_tab2;

3. Verify the Updated Schema:

Check the status of the updated objects:

sql

COLUMN object_name FORMAT A20 SELECT object_name, object_type, status FROM user_objects ORDER BY object_name;

Expected Output:


OBJECT_NAME OBJECT_TYPE STATUS -------------------- ------------------- ------- GET_DESCRIPTION PROCEDURE VALID REDEF_TAB TABLE VALID REDEF_TAB2_PK INDEX VALID REDEF_TAB_SEQ SEQUENCE VALID REDEF_TAB_V VIEW VALID

Notes:

  • Procedure and View Validity: The GET_DESCRIPTION procedure and REDEF_TAB_V view remains valid after redefinition because they reference the table, which is still present under a new name (REDEF_TAB).
  • Trigger Loss: The REDEF_TAB_BIR trigger is dropped because it was associated with the original table, which was renamed and subsequently dropped.

This comprehensive setup and redefinition process helps manage schema changes with minimal downtime, ensuring that your database schema evolves smoothly while maintaining data integrity.

Friday, June 10, 2016

Create Temporary Tables in Oracle


Global Temporary Tables in Oracle


Temporary tables are useful in applications where a result set is to be buffered, perhaps because it is constructed by running multiple DML operations. For example, consider the following:

A Web-based airlines reservations application allows a customer to create several optional itineraries. Each itinerary is represented by a row in a temporary table. The application updates the rows to reflect changes in the itineraries. When the customer decides which itinerary she wants to use, the application moves the row for that itinerary to a persistent table.

During the session, the itinerary data is private. At the end of the session, the optional itineraries are dropped.

This statement creates a temporary table that is transaction specific:

NOTE : Indexes can be created on temporary tables. They are also temporary and the data in the index has the same session or transaction scope as the data in the underlying table.

*********************************************************************************
HERE is an example to create a global temporary table with on commit DELETE ROWS :
*********************************************************************************

sql>  CREATE GLOBAL TEMPORARY TABLE admin_work_area
        (startdate DATE,
         enddate DATE,
         class CHAR(20))
      ON COMMIT DELETE ROWS;


sql>  insert into ADMIN_WORK_AREA values (sysdate,sysdate+ 1,'A');

1 row inserted.


sql> select * from ADMIN_WORK_AREA;

commit;

Commit complete.

sql> select * from ADMIN_WORK_AREA;


NOTE: records in this temp table will be deleted upon commit. This is equivalent to truncating table on commit.

*********************************************************************************
HERE is an example to create a global temporary table with on commit PRESERVE ROWS :
*********************************************************************************


sql>  CREATE GLOBAL TEMPORARY TABLE admin_work_area
        (startdate DATE,
         enddate DATE,
         class CHAR(20))
      ON COMMIT PRESERVE ROWS;
      
            
sql>  insert into ADMIN_WORK_AREA values (sysdate,sysdate+ 1,'A');

1 row inserted.

1 row inserted.

sql>  select * from ADMIN_WORK_AREA;

commit;

Commit complete.

sql>  select * from ADMIN_WORK_AREA;


NOW exit the session and login back and select the table.

sql>  select * from ADMIN_WORK_AREA;

table is empty

NOTE: records (rows) in this temp table will be deleted upon session exit only, as long as you are using same session you can see these rows. 
This is equivalent to truncating table on session exit.

Tuesday, June 7, 2016

CREATE INVISIBLE INDEX ON A TABLE

INVISIBLE INDEX:

Oracle 11g gives us ability to create indexes that can be marked as invisible. Invisible indexes are maintained like any other index, but they are ignored by the optimizer unless the OPTIMIZER_USE_INVISIBLE_INDEXES parameter is set to TRUE at the instance or session level

CREATE AN INVISIBLE INDEX:

CREATE INDEX INV_IDX_OS_USR ON TEST_IDX (ID) INVISIBLE;

lets check the newly created index :

SQL> select OWNER,INDEX_NAME,TABLE_OWNER,TABLE_NAME,VISIBILITY from all_indexes where index_name='INV_IDX_OS_USR';

OWNER         INDEX_NAME            TABLE_OWNER         TABLE_NAME      VISIBILITY       
--------      -----------                                    ----------               -----------                  --------
ATOORPU       INV_IDX_OS_USR       ATOORPU            TEST_IDX               INVISIBLE 


USER CAN'T MAKE USE OF INVISIBLE INDEX UNTIL HE MAKES IT VISIBLE IN THAT SESSION LETS SEE IF WE CAN USE INVISIBLE INDEX WITH OUT ENABLING IT IN OPTIMIZER:

select /*index (TEST_IDX INV_IDX_OS_USR)*/ * from TEST_IDX where ID=284;


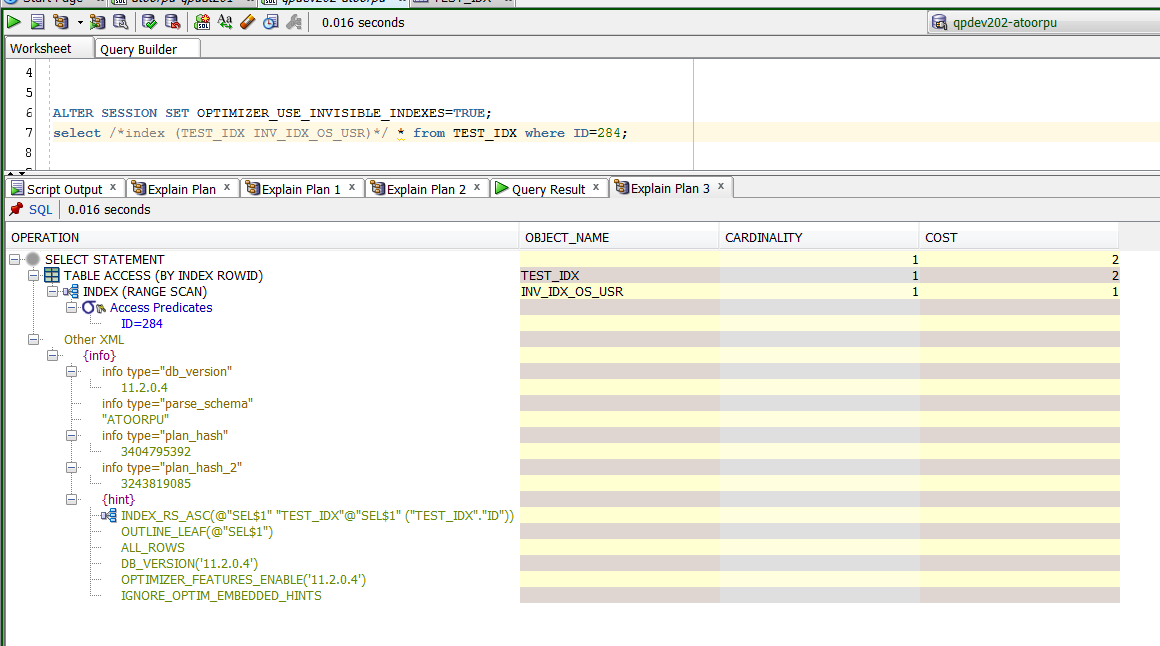
MAKING AN INDEX VISIBLE IN CURRENT SESSION:

ALTER SESSION SET OPTIMIZER_USE_INVISIBLE_INDEXES=TRUE;
select /*index (TEST_IDX INV_IDX_OS_USR)*/ * from TEST_IDX where ID=284;


MAKING AN INDEX INVISIBLE IN CURRENT SESSION:

ALTER SESSION SET OPTIMIZER_USE_INVISIBLE_INDEXES=FALSE;

select /*index (TEST_IDX INV_IDX_OS_USR)*/ * from TEST_IDX where ID=284;

-->> you will not have to provide any hints to use index. I have provided hint just to make sure  oracle uses it.

select  * from TEST_IDX where ID=284;        -->> Same as above


MAKING AN INDEX INVISIBLE OR VISIBLE:


Indexes can be created as invisible by using the INVISIBLE keyword at the end, and their visibility can be managed using the ALTER INDEX command

TO MAKE AN EXISTING INDEX INVISIBLE USE BELOW SYNTAX: 

ALTER INDEX index_name INVISIBLE;

TO MAKE AN EXISTING INDEX VISIBLE USE BELOW SYNTAX: 


ALTER INDEX index_name VISIBLE;


Wednesday, May 11, 2016

select from table with no direct relation or foriegn keys

SELECT
  E.EMPNO,
  E.ENAME,
  E.JOB,
  D.DEPTNO,
  D.LOC,
  E.SAL
FROM
  scott.emp E
LEFT JOIN SCOTT.DEPT D
ON
  E.DEPTNO=D.DEPTNO;


SELECT
  E.EMPNO,
  E.ENAME,
  E.JOB,
  D.DEPTNO,
  D.LOC,
  E.SAL,
  (
    SELECT      grade
    FROM
      SCOTT.SALGRADE S
    WHERE
      E.SAL BETWEEN S.LOSAL AND S.HISAL
  ) AS SALGRADE
FROM
  scott.emp E
LEFT JOIN SCOTT.DEPT D
ON
  E.DEPTNO=D.DEPTNO;


Wednesday, March 23, 2016

chr function and its values - CHR and ASCII values

chr function returns the ascii letter for that integer. We know that there are 255 ascii characters defined.

SQL> select chr(65) as CHR from dual;

CHR

A

Below code print all 255 ascii characters

Sample code to check the values :

begin
  for i in 1..255 loop
      dbms_output.put_line( 'CHR('||i||')' ||'=='|| chr(i) );
    end loop;
    end;
    /

This output might differ actually based on the chacterset you have choosen while installing you Database.

DBMS_OUTPUT :


   CHR(1)==
CHR(2)==
CHR(3)==
CHR(4)==
CHR(5)==
CHR(6)==
CHR(7)==
CHR(8)==
CHR(9)==   
CHR(10)==

CHR(11)==
CHR(12)==
CHR(13)==
CHR(14)==
CHR(15)==
CHR(16)==
CHR(17)==
CHR(18)==
CHR(19)==
CHR(20)==
CHR(21)==
CHR(22)==
CHR(23)==
CHR(24)==
CHR(25)==
CHR(26)==
CHR(27)==
CHR(28)==
CHR(29)==
CHR(30)==
CHR(31)==
CHR(32)==
CHR(33)==!
CHR(34)=="
CHR(35)==#
CHR(36)==$
CHR(37)==%
CHR(38)==&
CHR(39)=='
CHR(40)==(
CHR(41)==)
CHR(42)==*
CHR(43)==+
CHR(44)==,
CHR(45)==-
CHR(46)==.
CHR(47)==/
CHR(48)==0
CHR(49)==1
CHR(50)==2
CHR(51)==3
CHR(52)==4
CHR(53)==5
CHR(54)==6
CHR(55)==7
CHR(56)==8
CHR(57)==9
CHR(58)==:
CHR(59)==;
CHR(60)==<
CHR(61)===
CHR(62)==>
CHR(63)==?
CHR(64)==@
CHR(65)==A
CHR(66)==B
CHR(67)==C
CHR(68)==D
CHR(69)==E
CHR(70)==F
CHR(71)==G
CHR(72)==H
CHR(73)==I
CHR(74)==J
CHR(75)==K
CHR(76)==L
CHR(77)==M
CHR(78)==N
CHR(79)==O
CHR(80)==P
CHR(81)==Q
CHR(82)==R
CHR(83)==S
CHR(84)==T
CHR(85)==U
CHR(86)==V
CHR(87)==W
CHR(88)==X
CHR(89)==Y
CHR(90)==Z
CHR(91)==[
CHR(92)==\
CHR(93)==]
CHR(94)==^
CHR(95)==_
CHR(96)==`
CHR(97)==a
CHR(98)==b
CHR(99)==c
CHR(100)==d
CHR(101)==e
CHR(102)==f
CHR(103)==g
CHR(104)==h
CHR(105)==i
CHR(106)==j
CHR(107)==k
CHR(108)==l
CHR(109)==m
CHR(110)==n
CHR(111)==o
CHR(112)==p
CHR(113)==q
CHR(114)==r
CHR(115)==s
CHR(116)==t
CHR(117)==u
CHR(118)==v
CHR(119)==w
CHR(120)==x
CHR(121)==y
CHR(122)==z
CHR(123)=={
CHR(124)==|
CHR(125)==}
CHR(126)==~
CHR(127)==
CHR(128)==€
CHR(129)==
CHR(130)==‚
CHR(131)==ƒ
CHR(132)==„
CHR(133)==…
CHR(134)==†
CHR(135)==‡
CHR(136)==ˆ
CHR(137)==‰
CHR(138)==Š
CHR(139)==‹
CHR(140)==Œ
CHR(141)==
CHR(142)==Ž
CHR(143)==
CHR(144)==
CHR(145)==‘
CHR(146)==’
CHR(147)==“
CHR(148)==”
CHR(149)==•
CHR(150)==–
CHR(151)==—
CHR(152)==˜
CHR(153)==™
CHR(154)==š
CHR(155)==›
CHR(156)==œ
CHR(157)==
CHR(158)==ž
CHR(159)==Ÿ
CHR(160)==
CHR(161)==¡
CHR(162)==¢
CHR(163)==£
CHR(164)==¤
CHR(165)==¥
CHR(166)==¦
CHR(167)==§
CHR(168)==¨
CHR(169)==©
CHR(170)==ª
CHR(171)==«
CHR(172)==¬
CHR(173)==­
CHR(174)==®
CHR(175)==¯
CHR(176)==°
CHR(177)==±
CHR(178)==²
CHR(179)==³
CHR(180)==´
CHR(181)==µ
CHR(182)==¶
CHR(183)==·
CHR(184)==¸
CHR(185)==¹
CHR(186)==º
CHR(187)==»
CHR(188)==¼
CHR(189)==½
CHR(190)==¾
CHR(191)==¿
CHR(192)==À
CHR(193)==Á
CHR(194)==Â
CHR(195)==Ã
CHR(196)==Ä
CHR(197)==Å
CHR(198)==Æ
CHR(199)==Ç
CHR(200)==È
CHR(201)==É
CHR(202)==Ê
CHR(203)==Ë
CHR(204)==Ì
CHR(205)==Í
CHR(206)==Î
CHR(207)==Ï
CHR(208)==Ð
CHR(209)==Ñ
CHR(210)==Ò
CHR(211)==Ó
CHR(212)==Ô
CHR(213)==Õ
CHR(214)==Ö
CHR(215)==×
CHR(216)==Ø
CHR(217)==Ù
CHR(218)==Ú
CHR(219)==Û
CHR(220)==Ü
CHR(221)==Ý
CHR(222)==Þ
CHR(223)==ß
CHR(224)==à
CHR(225)==á
CHR(226)==â
CHR(227)==ã
CHR(228)==ä
CHR(229)==å
CHR(230)==æ
CHR(231)==ç
CHR(232)==è
CHR(233)==é
CHR(234)==ê
CHR(235)==ë
CHR(236)==ì
CHR(237)==í
CHR(238)==î
CHR(239)==ï
CHR(240)==ð
CHR(241)==ñ
CHR(242)==ò
CHR(243)==ó
CHR(244)==ô
CHR(245)==õ
CHR(246)==ö
CHR(247)==÷
CHR(248)==ø
CHR(249)==ù
CHR(250)==ú
CHR(251)==û
CHR(252)==ü
CHR(253)==ý
CHR(254)==þ
CHR(255)==ÿ

Tuesday, March 17, 2015

Dropping large columns in database - ORACLE


alter table table_name set unused 

There may be a situation where you want to drop a column that has a huge data 10 Million rows .It will take lot of time to drop that column and the worst part is that Oracle will place a lock on that tables until With the " alter table set unused " command you can make that column invisible to users. at a later point of time. when you set the column to unused it will be stored in sys as unused.

MARKING UNUSED COLUMN

sql> 

desc abc_test
Name       Null Type         
---------- ---- ------------ 
NAME            VARCHAR2(20) 
TOTAL_ROWS      NUMBER                                                                                                 

sql>  


alter table abc_test add (lname varchar2(20))
table ABC_TEST altered.


sql>  


desc abc_test
Name       Null Type         
---------- ---- ------------ 
NAME            VARCHAR2(20) 
TOTAL_ROWS      NUMBER       
LNAME           VARCHAR2(20) 

sql> 

alter table abc_test set unused (lname)

table ABC_TEST altered.

sql>  


desc abc_test
Name       Null Type         
---------- ---- ------------ 
NAME            VARCHAR2(20) 
TOTAL_ROWS      NUMBER                                                                                                 


Once this is done the columns will no longer be visible to the user. If at a later date you have time to physically delete the columns this can be done using the following. 

Note : 

Dropping the unused column will still put a lock on the base table. I suggest you to drop 
unused column during maintenance period, to avoid locking.

ALTER TABLE table_name DROP UNUSED COLUMNS CHECKPOINT 250;

The DBA_UNUSED_COL_TABS view can be used to view the number of unused columns per table.


Physically dropping column 

To physically drop a column you can use one of the following syntaxes, depending on whether you wish to drop a single or multiple columns.

ALTER TABLE table_name DROP COLUMN column_name; -- 1 column
ALTER TABLE table_name DROP (column_name1, column_name2);  -- multiple columns